Before committing to a solution, you need to understand what users are trying to accomplish and what they need in order to succeed, otherwise, you risk designing features that improve the current process without addressing the underlying need.
In earlier chapters you looked at discovery and how interviews, observation, workshops, documents, data, and other evidence help you understand your stakeholders and the problem or opportunity. You also learned about stakeholder groups, their goals and concerns, and how to capture emerging needs and backlog items. You will also now understand that in learning about the various stakeholder groups, you will likely identify the broad groups of roles and users such as internal organizational groups like Finance, IT Support, or external ones like suppliers.
In this chapter, you'll learn how to refine those groups into meaningful user roles. Those may be different because the people within the same stakeholder group may perform different work, have different responsibilities and decision authority, and therefore have different goals and needs.
Understanding user needs involves looking at several related things including their goals, which are the outcomes people are trying to achieve, as well as their activities and the specific tasks they do as part of those activities.
Techniques for Understanding and Describing User Needs
You'll build on what you learned through interviews, observation, contextual inquiry, workshops, documents, operational data, prototyping, and other discovery work.
The techniques in the rest of this chapter help you analyze user needs and describe them in forms that users, stakeholders, designers, and developers can review and discuss. You will not necessarily use every technique so choose the ones that help answer the questions you still have. As you use them, expect to uncover new information, question earlier assumptions, and move back and forth between research, analysis, prototyping, and requirements.
| Technique | Use it when you need to understand or describe... | Informed by... |
|---|---|---|
| Analyzing user goals | The outcomes users are trying to achieve, why those outcomes matter, and what success looks like from their perspective. | Interviews, contextual inquiry and observation, workshops, operational data |
| Task analysis | The activities, tasks, decisions, information needs, dependencies, variations, and exceptions involved in achieving a goal. | Contextual inquiry and observation, interviews, process and document review, usage data |
| Role-based persona | The goals, responsibilities, behaviors, knowledge, authority, abilities, needs, and constraints that characterize an important user role. | Interviews, observation, workshops, surveys, stakeholder analysis |
| Journey map | How a user works toward a goal over time and across activities, touchpoints, systems, people, and channels, including where needs and difficulties arise. | Interviews, contextual inquiry and observation, workshops, operational and service data |
| Prototyping | How users respond to possible workflows, information, interactions, and system behavior, and what new or revised requirements emerge. | Earlier research findings, co-design, user evaluation and testing |
| Use case | How a user and system interact to achieve a particular goal, including normal, alternative, and exception paths. | Interviews, task analysis, observation, business rules and process documentation, prototype findings |
| User story | A concise way to capture a user need or capability for discussion, refinement, prioritization, and inclusion in the backlog. | Interviews, observation, goal and task analysis, personas, journeys, prototype findings |
Understanding User Goals
Before you define what a solution should do, you need to understand what people are trying to achieve. Goals describe the outcomes people are working toward and the results that matter to them, and understanding their goals helps you focus on what success looks like from the user's perspective rather than on the way work happens today.
Goals provide a better foundation for designing your solution because they describe the underlying outcome a user is trying to achieve. Activities and tasks, by contrast, are often shaped by the systems, processes, and technologies currently in place. Focusing solely on a task can lead you to optimize that task without improving the broader process or addressing the user's underlying need. By starting with the goal, you have more freedom to consider different approaches, processes, and solutions for achieving the desired outcome and tend to remain more stable as the ways of achieving them change (Cooper et al., 2014).
For example, someone may currently copy information from several systems into a spreadsheet before making a decision. Those steps describe how they work today. Their goal may be to make an accurate decision quickly using relevant and reliable information. Understanding the goal allows you to explore other ways of supporting it rather than simply reproducing the existing tasks.
Users may also have goals that conflict with those of other roles or with organizational priorities. See Chapter 3 for techniques for identifying and working through stakeholder goal conflicts.
Defining User Goals
Review what you have learned and look for recurring clues about what people are trying to achieve, what matters to them, and what they consider good outcomes. People may not always tell you exactly what their goals are, as it can be hard for them to articulate these, so analyze what they say and do to help you identify the actual goal.
Avoid assuming that everyone in the same role will perform or experience the work in the same way. Use interviews, observation, and testing with people with a range of abilities and experiences to identify where the solution should provide different ways of accessing information, completing work, receiving feedback, or recovering when something goes wrong.
You want to approach goals in this way because people may also differ in how they see, hear, move, remember information, maintain attention, communicate, or process complex information. Such differences may directly surface accessibility needs, but they can also reveal less obvious requirements around how information is presented and how tasks are structured.
To identify user goals:
- Start with the user or role. Whose goal are you describing?
- Identify the desired outcome. What are they ultimately trying to accomplish?
- Ask why it matters. What makes that outcome valuable or important to them?
- Check the goal against your evidence. Make sure it reflects patterns in what you learned, then review your interpretation with users where appropriate.
You can capture user goals using a simple needs statement which includes the user role, the need, which is a short description of what the user is attempting to achieve or address, and the outcome which articulates the underlying motivation, emotional driver, or measurable outcome the user expects once the need is met.
Here's an example. A Purchasing Manager (role) needs to make an accurate and compliant purchasing decision (need) in order to spend budget efficiently without risking costly regulatory or internal compliance errors (outcome).
Building on your understanding of user goals by looking closely at the activities and tasks they perform helps you identify user needs and translate them into requirements and backlog items, including user stories.
Understanding Task Analysis
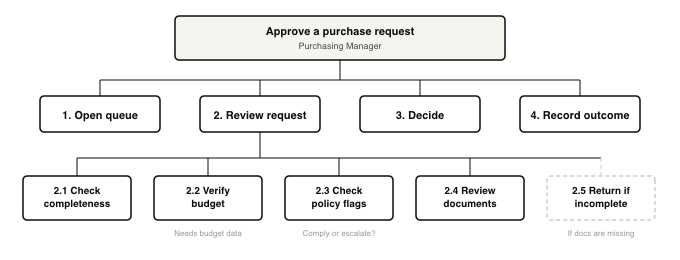
Task analysis helps you break a user's work and activities into the tasks and subtasks they perform so you can understand how their work gets done, the decisions people make, the information they need, the dependencies and constraints they face, and the points where work becomes difficult, inefficient, or prone to error.
Keep in mind that existing tasks are often shaped by current systems, processes, policies, and technology. A task may exist because it is genuinely necessary, or simply because the current way of working requires it. As you analyze the work, look for where tasks might be simplified or better supported, otherwise, you risk designing a new system that reproduces inefficient processes and existing workarounds rather than improving how people achieve their goals (Cooper et al., 2014).
This gives you a stronger basis for defining user needs and requirements and for exploring better ways to support the work and the goals behind it.
How to Analyze Tasks
A simple sketch or diagram can help you visualize and analyze the work. Once you have a draft, review it with the people who perform the work and update anything you missed or misunderstood. Be sure to address details such as:
- Identify the activity. What broader area of work are you examining as part of achieving that goal?
- Identify the main tasks. Break the activity into the main tasks the user performs.
- Break complex tasks into subtasks. Go only as far as you need to understand the work and what the solution may need to support.
- Look at decisions, information, and dependencies. What does the user need to know, decide, or rely on at each point?
- Capture variations and exceptions. What changes when information is missing, something fails, or an unusual case occurs?
Synthesizing What You Know About Users With Role-based Personas
By this point, you'll know quite a bit about the people doing the work and a role-based persona helps you distill the findings about your user into a profile you can refer to throughout design and development, helping ensure that requirements and design decisions reflect what you learned about your users.
When developing your persona, focus on the characteristics that affect what the solution needs to support. Describe skills and experience through concrete behaviors rather than broad labels such as novice, expert, technical, or nontechnical. For example, knowing what someone regularly does, what kinds of decisions they make, and where they need help gives you more useful guidance for requirements around terminology, onboarding, error recovery, and support (Cooper et al., 2014).
Only include demographic characteristics such as age, gender, or ethnicity when your research shows that they actually affect users' needs, behavior, or context. Adding demographic details without a research-based reason can introduce stereotypes rather than useful evidence (Turner & Turner, 2011).
A useful persona captures:
- Role: The role or user group the persona represents.
- Primary goals: The outcomes people in this role are trying to achieve.
- Key tasks and decisions: The main activities they perform and decisions they make.
- Decision authority: What they can approve, reject, edit, configure, or escalate.
- Information needs: The information needed to act, decide, or complete their work.
- Domain expertise: Their knowledge of the work, policies, terminology, and common exceptions.
- System experience: How often they use the current system or similar tools and where they may need guidance.
- Pain points: Where they experience friction, delay, confusion, unnecessary effort, risk, or other conditions that make the work harder.
- Dependencies: The people, systems, data, approvals, and handoffs they rely on.
- Success measures: How people in this role would judge the solution as useful and effective.
Example role-based persona for a Purchasing Manager.
| Role | Purchasing Manager |
|---|---|
| Primary goals | Approve valid purchase requests promptly, maintain compliance with purchasing policies, and manage organizational spending responsibly. |
| Key tasks and decisions | Review purchase requests, verify supporting documentation, confirm budget availability, apply purchasing policies, and approve, return, or escalate requests. |
| Decision authority | Can approve standard purchases within defined financial and policy limits, return incomplete requests, and escalate exceptions or higher-value purchases. |
| Information needs | Complete request details, budget availability, applicable policy rules, supporting documents, supplier information, and relevant approval history. |
| Domain expertise | Understands purchasing policies, approval thresholds, common procurement risks, and routine exceptions. |
| System experience | Uses purchasing and finance systems daily and can complete routine approvals efficiently but may need support when information is spread across several systems or when requests involve unusual exceptions. |
| Pain points | Incomplete submissions, inconsistent information, unclear policy exceptions, missing documentation, and excessive follow-up by email. |
| Constraints | Limited review time, high request volume, audit and compliance obligations, approval deadlines, and fragmented information across multiple systems. |
| Dependencies | Requestors, procurement staff, budget owners, finance systems, policy owners, supplier records, and upstream approval workflows. |
| Success measures | Shorter approval times, fewer incomplete or returned submissions, fewer policy violations, reduced follow-up, and a clear audit trail. |
Mapping a User's Experience with Journey Maps
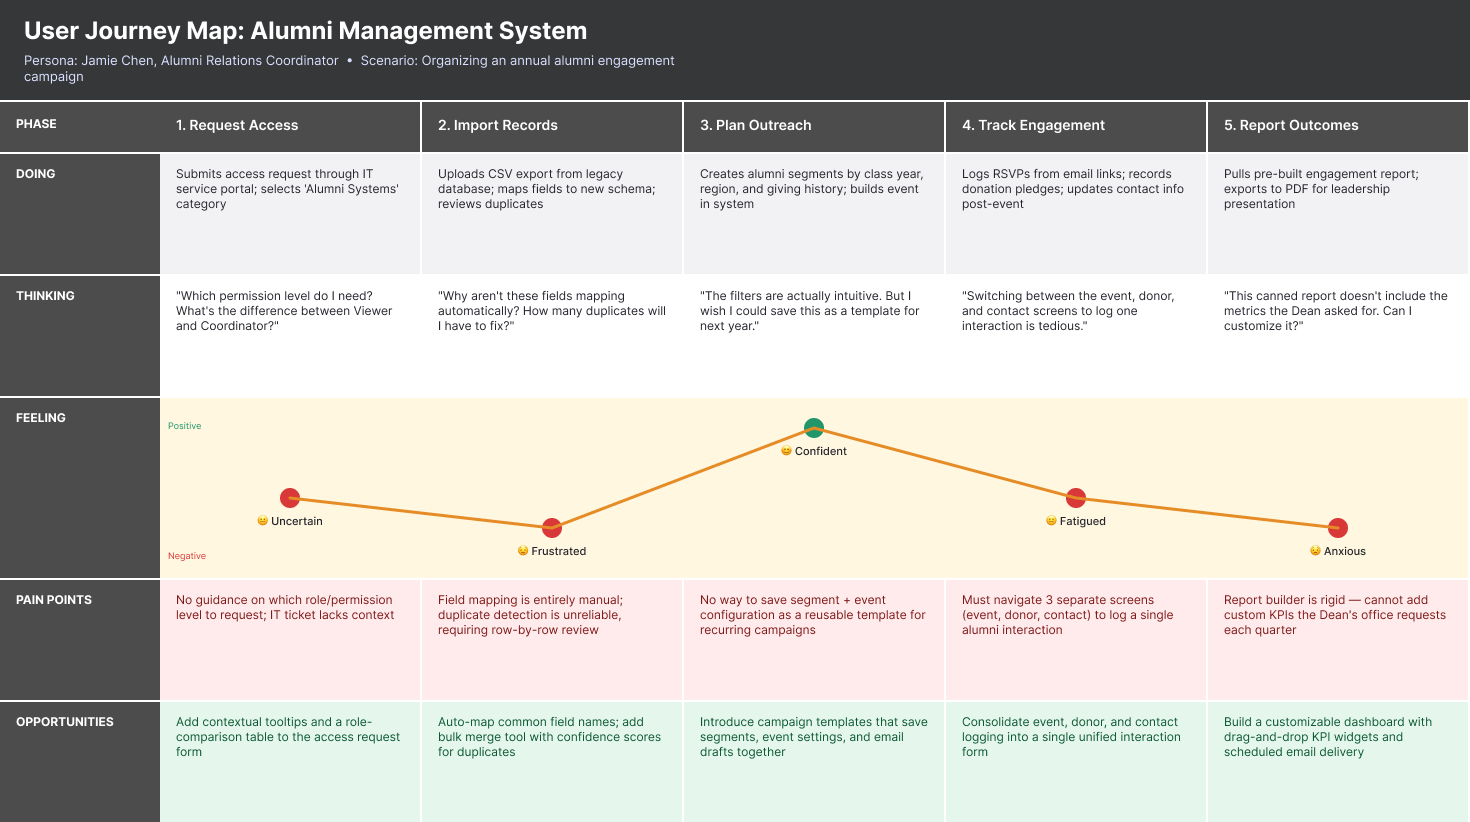
Creating a user journey map helps you understand the experience from the perspective of the person involved and helps you identify pain points, gaps, and opportunities for improvement. It shows the stages a role moves through in pursuit of a goal, illustrating the experience over time. Depending on what you're exploring, the map may include what the user is doing, thinking, and feeling, the touchpoints and channels involved, and the pain points they encounter (Stickdorn et al., 2018).
How to Create a Journey Map
Select a user role whose experience you are mapping and what they are trying to accomplish and then:
- Define the stages. Stages are the meaningful phases of the experience from the user's perspective. Start broad, then refine to a level that supports useful analysis.
- Document actions and touchpoints. Include emails, forms, meetings, approvals, and offline work, not just software screens. Pay close attention to what happens between steps, such as waiting, re-explaining, or re-entering data. These transitions are often where the experience starts to break down.
- Capture needs, questions, pain points, and reactions at each stage. Include emotions where they are relevant and supported by your research.
- Identify opportunities. Look for repeated friction, such as delay, duplicate effort, or no visibility into status.
- Validate the map. Review it with users and with stakeholders who influence or are affected by the experience to confirm it reflects what actually happens.
Keep your journey map focused on the user's experience rather than the organization's internal process. If your stage names sound like department names, system steps, or workflow labels, revise them from the user's point of view. Use stages that describe what the user is trying to do, such as finding information, submitting a request, or getting help.
Using Prototypes to Understand User Needs
Prototypes help you learn what users need and surface requirements in a way that people can react to. They are particularly useful when requirements are difficult to express in words alone or when you need to explore how information, workflows, interactions, or system behavior should work.
There are a number of different ways to prototype, depending on what it is you're trying to learn, so decide what you need to learn, then use the simplest form that will help answer that question.
Paper prototypes and sketches work well for testing layout, information hierarchy, and navigation. They're fast to create and easy to modify on the spot, making them ideal for co-design workshops where you sketch with users and incorporate feedback in real time. Use them to test whether users can find the right information, whether a workflow makes sense, or whether the terminology is clear.
Wireframes and clickable prototypes add enough structure to test multi-step flows, transitions between screens, and the relationship between different parts of the interface. Use them when you need to test whether users can complete a task end-to-end, whether handoffs between roles are supported, or whether error states and recovery paths work. Clickable prototypes can help you check accessibility criteria such as heading structure, label clarity, and keyboard support, identifying if a user navigates the interface without a mouse or if form fields and error messages are distinguishable without relying on color alone.
Functional prototypes include real or realistic data, working logic, and closer-to-final interaction. Use them when you need to test technical feasibility, data quality, performance, or whether the system behaves as users expect under realistic conditions.
Wizard of Oz prototypes simulate system behavior using a person behind the scenes. The user interacts with what appears to be a working system, but some or all of the responses are generated manually. This approach is particularly valuable when you need to test requirements for functionality that would be expensive or time-consuming to build before you've validated that the proposed behavior meets user needs. Classic examples include testing a recommendation engine by having a domain expert manually select recommendations, or testing an automated approval routing system by having a team member route requests according to proposed rules.
Using AI for Prototyping
Generative AI can make it faster to create and revise prototypes and can work well when done with users. For example, you might include users in a co-design session, participants might sketch screens, arrange information, explore different workflows, or use an AI tool to create something they can react to and change. Some tools can also work from sketches, screenshots, or photographs of paper prototypes, making it possible to turn an early idea into a more interactive prototype without writing code. Additionally, providing the tool with an existing design system, style guide, or example interfaces can help the model produce output more consistent with the environment you are designing for.
AI can also generate realistic sample content and data, such as customer records, transaction histories, purchase requests, or exception cases. This can make a prototype feel more like the environment users actually work in and help you explore how well the design supports realistic situations rather than testing it with generic placeholders such as "Item 1" or "Item 2."
Generative AI also creates new opportunities for prototyping products that themselves include AI capabilities. If a system will summarize documents, recommend actions, answer questions, or generate content, you can prototype both the interface and the proposed AI behavior. When a product itself includes generative AI, prototyping can involve both the interface and the behavior of the AI. The prompts, examples, constraints, and other instructions used to shape model output become part of the prototype because they influence what the system produces and how users experience it (Subramonyam et al., 2025).
AI-generated prototypes should still be treated as prototypes, not finished designs, particularly as models can make assumptions you did not intend, produce inconsistent interactions, overlook accessibility requirements, invent unrealistic data or behavior, and generate interfaces that appear polished without actually supporting the user's work. They may also reproduce familiar interface patterns even when those patterns are not appropriate for the problem you are exploring.
Review the output against your research, requirements, accessibility needs, and design standards, and do not assume that generated code or interactions are ready for production.
How to Run a Prototyping Workshop
Prototyping can be something you do with users, such as in a co-design session, participants might sketch screens, arrange information on paper, move cards to show a preferred workflow, or use an AI tool to create prototypes, and giving participants something concrete they can shape, react to, and use can help identify, describe and refine your understanding of your users' needs.
- Include a range of participants. You should test with people who represent different roles, experience levels, abilities, and perspectives. A workflow that makes sense to an experienced analyst may confuse a new employee who doesn't yet know what a policy exception is or who has authority to approve one. You should also include participants who rely on screen readers, voice input, switch access, or other assistive technologies as they reveal interaction patterns and barriers that sighted, mouse-using testers won't encounter (W3C, 2024).
- Define the scenario and the question. Each session should focus on a specific scenario and a specific question you want to answer. "Test the new dashboard" is too broad. "Can a regional manager identify which accounts need attention this week using the dashboard's default view?" gives you something you can observe and evaluate. Writing the question down before the session keeps you from drifting into general feedback collection.
- Frame tasks as scenarios, not instructions. Rather than telling participants "find the approval screen," give them a situation: "You have fourteen requests in your queue, and one is flagged as a policy exception. Walk me through what you'd do." Scenarios produce more realistic behavior and more useful feedback than step-by-step directions, because they let participants bring their own judgment about what to do first and what information they need (Stickdorn et al., 2018).
- Observe before you ask questions. Watch where participants hesitate, backtrack, or look for information that isn't there. These moments often reveal unmet needs that participants won't articulate unprompted.
- Debrief after each session. Capture three things while they're fresh: which requirements the session validated, which need revision, and what new needs emerged that you hadn't anticipated.
As your understanding develops, you can begin translating what you are learning into requirements. This often happens alongside research, analysis, and prototyping rather than after them. Writing a user story, developing a use case, or exploring a prototype may expose gaps, raise new questions, or lead you back to users for further investigation.
User Stories
User stories give you a simple way to capture a user need or capability in the backlog so you and the development team can discuss and refine it. A user story is a concise, user-centered statement that captures what a particular user needs and why it matters to them. It serves as a starting point for discussion rather than a finished specification, giving you and the delivery team enough shared understanding to plan, estimate, and begin a conversation about how to meet the need (Cohn, 2004).
A common format is: As a [role], I want [task or activity] so that [goal or benefit]
For example: As a purchasing manager, I want to see the information I need to evaluate a purchase request so that I can make compliant decisions quickly.
Writing stories in this format helps keep attention on what the user is trying to accomplish rather than jumping too quickly to interface choices or implementation details. It also helps break larger needs into smaller, more manageable pieces of work while keeping the connection to user value.
User stories are refined as you learn more about user needs and finalized before development begins. Once you have drafted a story, it is useful to check whether it is clear and workable, and Bill Wake's INVEST mnemonic (Wake, 2003) provides a simple checklist for assessing the quality of a user story:
- Independent: self-contained and able to be developed separately.
- Negotiable: open to discussion and refinement.
- Valuable: delivers value to users or customers.
- Estimable: specific enough for the team to estimate.
- Small: narrow enough to complete within one iteration or sprint.
- Testable: clear enough to verify when it is done.
Not every story will be clear or complete on the first pass, and you'll continue to refine stories as you learn more about user needs and prepare them for development. Using the INVEST criteria can help you identify where a story needs further clarification, research, or discussion before the team is ready to implement it.
Acceptance Criteria
Acceptance criteria describe the important conditions that must be met for a user story to be considered complete and to support the underlying user need. They help reduce ambiguity by describing the expected behavior, outcomes, business rules, and other conditions that matter.
Where a story has specific accessibility implications, include these directly in its acceptance criteria. Broader accessibility requirements that apply across the solution can be captured as system-wide requirements or development standards so they are considered consistently during design, implementation, and testing.
It's unlikely you'll capture every acceptance criterion or edge case at the start, so focus on capturing the important criteria you identify with your users. Then, include more details as you refine the backlog closer to development.
Defining Use Cases
Use cases help you describe how a user and a system interact step by step to achieve a specific goal or outcome and are especially helpful when you need to clarify normal, alternative, and exception flows, or when a task involves several steps, decisions, or handoffs that the team must understand in more detail.
You do not need to create a use case for every user story and use cases are most valuable when the interaction is complex enough that a short user story cannot communicate the flow, alternatives and exceptions clearly or if they are a standard that is required by your organization.
How to Create a Use Case
To create a use case, start by identifying the user's goal and the primary actor involved. Then define the preconditions, or what must already be true before the interaction begins. Write the main flow as a clear sequence of steps showing how the user and system work together to achieve the goal. After that, add alternative flows for legitimate variations and exception flows for errors or breakdowns. Finish by noting the postconditions, or what is true once the interaction is complete.
A Simple Use Case Template
- Use Case Name: A brief name for the interaction
- Primary Actor: The main role involved
- Goal: What the actor wants to achieve
- Preconditions: What must already be in place before the interaction starts
- Main Flow: The usual step-by-step interaction
- Alternative Flows: Other valid ways the interaction might proceed
- Exception Flows: What happens if something goes wrong
- Postconditions: What should be true when the interaction ends
| Use Case Name | Approve Purchase Request |
|---|---|
| Primary Actor | Purchasing Manager |
| Goal | Review and approve a valid request |
| Preconditions | Request has been submitted and routed to the manager |
| Main Flow | Manager opens the request queue. Manager selects a request. The system displays request details, policy flags, budget information, and supporting documents. Manager reviews the request. Manager approves the request. The system records the approval and routes the request to the next step. |
| Alternative Flow | Manager returns the request for clarification with comments. |
| Exception Flow | Required supporting documentation is missing, so the system prevents approval and prompts the manager to return the request. |
| Postconditions | The request is approved or returned, and the system records the decision. |
Update the Backlog
As you learn more about users, their needs, and the work they are trying to accomplish, you will identify things the solution may need to support. Capture these in the backlog as they emerge rather than waiting until your research is complete. At this stage, the items can remain provisional and relatively high-level, reflecting what you know so far and giving you a place to capture needs, capabilities, risks, and questions that can be refined as your understanding develops.
An initial backlog based on user needs might include items such as:
- status visibility for purchasing coordinators across departments
- clear approval criteria at the point of decision for managers
- role-specific onboarding for new employees
- error handling that explains both the problem and how to fix it
Each item in your initial backlog should link back to the supporting research, the role affected, and its priority. That connection helps stakeholders understand why the item is there and gives the team a clearer basis for making and explaining design decisions as the work moves into design and development.
The backlog is not fixed at this stage and as you learn more about the needs the solution must support, you'll decompose or break down high-level items into more detailed user stories that continue to be refined further as development approaches.
References
Cohn, M. (2004). User stories applied: For agile software development. Addison-Wesley.
Cooper, A., Reimann, R., Cronin, D., et al. (2014). About face: The essentials of interaction design (4th ed.). Wiley.
Stickdorn, M., Hormess, M., Lawrence, A., et al. (2018). This is service design doing. O'Reilly Media.
Subramonyam, H., Thakkar, D., Ku, A., et al. (2025). Prototyping with prompts: Emerging approaches and challenges in generative AI design for collaborative software teams. CHI Conference on Human Factors in Computing Systems (CHI '25).
Turner, P., & Turner, S. (2011). Is stereotyping inevitable when designing with personas? Design Studies, 32(1), 45–60.
W3C. (2024). Involving users in evaluating web accessibility. https://www.w3.org/WAI/test-evaluate/involving-users/
Wake, B. (2003). INVEST in good stories and SMART tasks. XP123. https://xp123.com/invest-in-good-stories-and-smart-tasks/