Explore user goals and needs and learn how to turn what you learn into requirements the team can use in design and development.
In Chapter 4, you defined the product vision, goals, and roadmap. That work clarified what the organization is trying to achieve, why the initiative matters, and how success will be measured.
This chapter shifts focus to the people who will use the system, helping you explore their goals and needs, and shows how to turn what you learn into requirements the team can use in design and development.
What You Will Learn
Distinguish between user goals, user needs and user requirements
Identify the user roles your solution must support
Build role-based personas grounded in evidence
Write user scenarios, use cases and user stories
Define accessibility requirements as part of user-facing quality
Validate user needs and requirements through prototyping and testing
Goals, Needs and Requirements
Before defining requirements, it helps to distinguish among goals, needs, and user requirements. These terms are closely related, but each describes different dimensions of the users you're designing for.
In practice, you move back and forth between these levels, exploring user goals, identifying needs, and then translate these into requirements the team can design, prioritize, and build against.
Exploring and Defining Needs and Requirements
Working with your users (i.e. doing research) helps you see what users are trying to achieve, what they need in order to do it, how they actually go about the work, and what the system must support in response.
It also helps surface the context and conditions your users do their work and therefore how they will use your solution. People often work under time pressure, within policy constraints, across teams, through legacy systems, and with different levels of experience. A requirement that looks reasonable in the abstract may still fail if it does not fit that context (Stickdorn et al., 2018).
As you review your research, look for:
As you do this, pay attention to contextual factors such as task complexity, the work environment, user expertise, accessibility need, time pressure, policy and compliance constraints, cross-functional dependencies, and accessibility or interaction needs.
Identifying these patterns helps you use your research to define the requirements your solution must address and to design a solution that fits real user needs. The following sections show how to turn those findings into practical artifacts such as role definitions, scenarios, journey maps, use cases, and user stories. Throughout, the goal is to keep them grounded in evidence rather than assumptions.
You do not need every artifact in every project. Choose the ones that best help you understand the user's work, communicate what the system must support, and reduce the biggest risks or uncertainties. These artifacts often build on one another, but how many you need depends on the complexity of the work and how much ambiguity remains.
Develop Role-Based Personas
A role is a group of users who share goals, activities, and constraints, so you can design for the group rather than for each person you interviewed (Cohn, 2004).
Personas, scenarios, stories, and story maps all build on a clear set of roles. If you skip role identification and go straight to personas, you risk describing a few memorable individuals while missing user groups whose needs differ in ways that matter for the system.
How to Identify User Roles
Use the findings from initial meetings, interviews and work with your stakeholders to help identify roles by:
Keep roles focused on individual users rather than whole organizations. "The finance team" is not a role. The finance analyst who reviews budget data and the finance director who approves exceptions are two roles with different goals and authority.
Developing the Persona
A role-based persona summarizes the role's responsibilities, goals, constraints, and interactions with other roles and systems. It should be built from your research findings, not assumptions. A good persona helps guide design decisions by answering questions such as:
Use the following to guide the development of your role based persona.
Primary goals: Approve valid requests quickly, maintain compliance, manage spending responsibly
Key tasks: Review requests, verify supporting documentation, check budget and policy information, approve or return requests
Decision authority: Can approve standard purchases within defined limits; escalates exceptions
Information needs: Request details, budget data, policy rules, supporting documents, previous approvals
Pain points: Incomplete submissions, inconsistent information, unclear exceptions, too many follow-up emails
Constraints: Limited time, high request volume, audit requirements, multiple systems
Dependencies: Requestors, procurement staff, finance systems, policy owners
Success measures: Fewer approval delays, fewer incomplete submissions, fewer policy violations
Scenarios
A scenario is a short narrative that describes someone pursuing a goal in a specific, realistic context and helps explore and explain why the goal matters. Scenarios are useful for exploring user needs before you move into more detailed requirements (Cooper et al., 2014).
Writing a Scenario
Write scenarios from a specific user's point of view and ground them in a specific situation. Include the context that shapes the work, such as time pressure, interruptions, available information, tools, dependencies on other people, and organizational constraints.
Describe what they're trying to accomplish, what they do, and what success looks like from their point of view. Do not specify interface elements or detailed system behavior at this stage. That level of detail comes later, in user stories or use cases.
A strong scenario usually includes:
Keep scenarios short, typically one to three paragraphs. Write in the present tense from the persona's perspective. Include enough contextual detail to make the situation feel real without prescribing how the system should respond.
Maya is a purchasing manager responsible for approving purchase requests for her department. It is Tuesday morning, and she is working through a full queue before a budget meeting later that day. Several requests are routine, but one involves an exception to standard purchasing policy. Maya needs to decide quickly, but the information she depends on is scattered across emails, attached documents, and policy guidance she has to interpret in context.
As she reviews the request, Maya checks whether the purchase is justified, whether the supporting documentation is complete, and whether the request fits within budget and policy. She also needs enough context to understand why the exception is being requested and whether similar requests have been handled before. When key information is unclear or missing, she has to pause, follow up with the requester, and delay the decision. What Maya wants is not a more complicated approval process, but enough clear, relevant information at the point of decision to act confidently, consistently, and without unnecessary back-and-forth.
Notice that the scenario doesn't mention screens, buttons, or system responses. It describes what Maya is trying to do, what she needs, what gets in her way, and what good looks like.
From this narrative, you can derive multiple user stories and write acceptance criteria grounded in a realistic situation.
Mapping a User's Experience
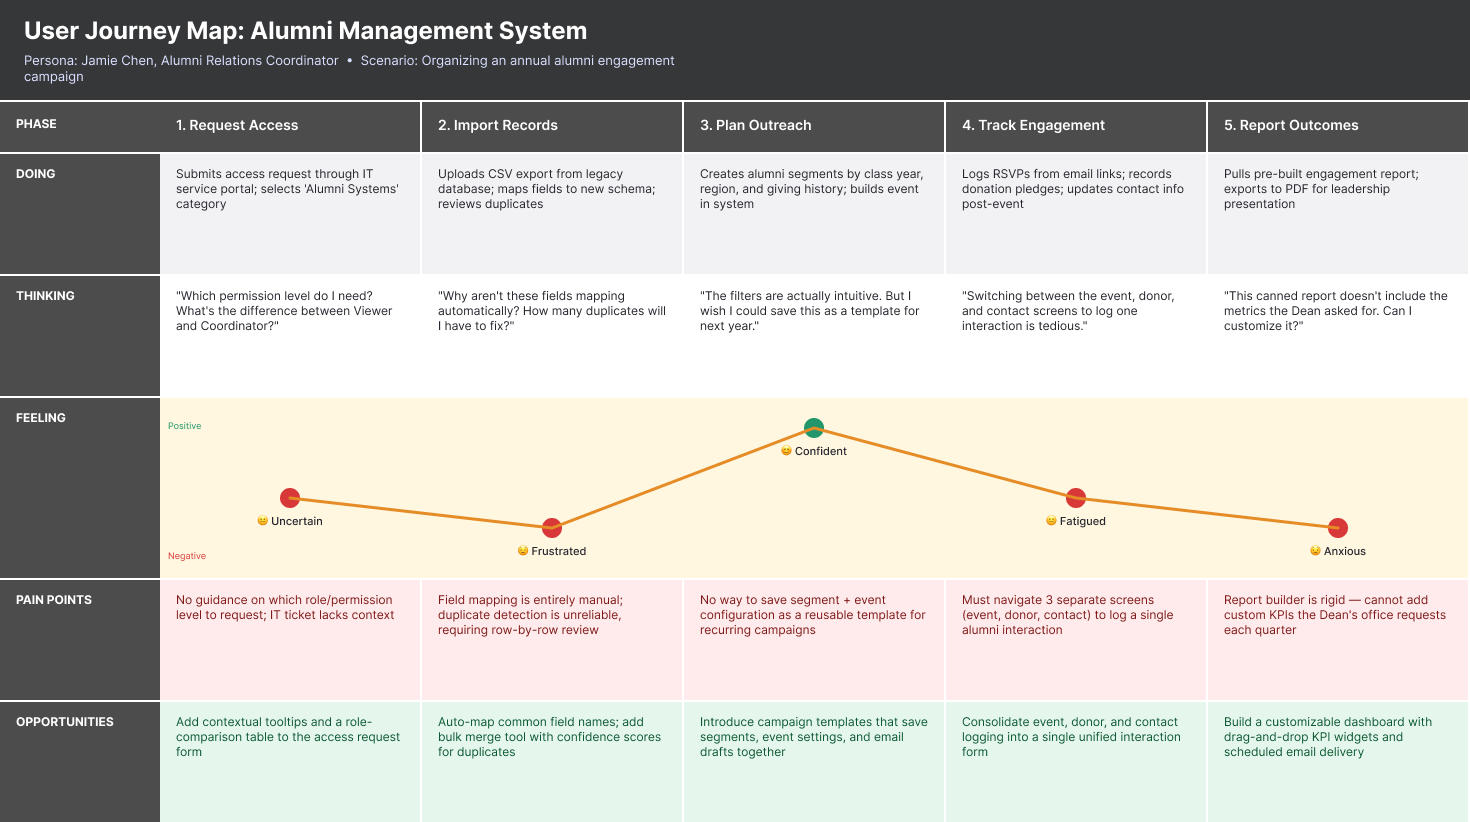
A journey map shows the stages a user moves through as they pursue a goal. It captures the experience over time, including what the user is doing, thinking, and feeling, the touchpoints and channels involved, and the pain points and opportunities that emerge along the way (Stickdorn et al., 2018).
Journey maps can help you identify where to focus first. Pain points that come up repeatedly, affect multiple roles, or occur at particularly high-friction moments are often good places to start.
If a process involves several roles, create a separate journey map for each role rather than trying to combine them into a single map. Each role usually has different goals, activities, and pain points, and combining them can blur the detail that makes a journey map useful. Once you have the individual maps, compare them side by side to see where one role's experience creates friction for another. If you need to show how work moves across roles, handoffs, and decisions, a workflow diagram is often a better fit. We explore workflow diagrams in a later chapter.
How to Create a Journey Map
Use Cases
A use case describes how a user and a system interact step by step to achieve a specific goal. Use one when the interaction has enough complexity that a scenario alone stays too broad or a user story stays too brief. Use cases are especially helpful when you need to clarify normal, alternative, and exception flows, or when a task involves several steps, decisions, or handoffs that the team must understand in more detail.
How to Create a Use Case
To create a use case, start by identifying the user's goal and the primary actor involved. Then define the preconditions, or what must already be true before the interaction begins. Write the main flow as a clear sequence of steps showing how the user and system work together to achieve the goal. After that, add alternative flows for legitimate variations and exception flows for errors or breakdowns. Finish by noting the postconditions, or what is true once the interaction is complete.
A Simple Use Case Template
Primary Actor: Purchasing Manager
Goal: Review and approve a valid request
Preconditions: Request has been submitted and routed to the manager
1. Manager opens the request queue.
2. Manager selects a request.
3. The system displays request details, policy flags, budget information, and supporting documents.
4. Manager reviews the request.
5. Manager approves the request.
6. The system records the approval and routes the request to the next step.
Exception Flow: Required supporting documentation is missing, so the system prevents approval and prompts the manager to return the request.
Postconditions: The request is approved or returned, and the system records the decision.
User Stories
A user story is a concise, user-centered statement that captures what a particular user needs and why it matters. It gives you and the delivery team a starting point for discussion and helps define a user requirement (Cohn, 2004).
User stories are useful because they help break larger needs into smaller, more manageable pieces of work while keeping the focus on user value.
A common format is:
For example:
As a purchasing manager, I want to see the information I need to evaluate a purchase request so that I can make compliant decisions quickly.
Writing stories in this format helps keep the focus on what the user is trying to accomplish rather than jumping too quickly to interface choices or implementation details.
Once you've drafted a story, it helps to do a quick quality check. Bill Wake's INVEST mnemonic (Wake, 2003) is a useful way to judge whether a story is ready for development.
Not every story will be clear or complete on the first pass, and that is normal. Stories are refined as the team learns more about user needs and are finalized before development begins.
Acceptance Criteria
A user story on its own is rarely specific enough to build from. Acceptance criteria make it more concrete by identifying the main conditions that must be met for the story to support the user's need.
At this stage, you are not trying to capture every edge case or implementation detail. That deeper refinement happens later, when the team reviews and prepares backlog items for delivery. For now, the goal is to capture the most important conditions the solution must support, based on what you learned in research.
For the purchasing manager story above, initial acceptance criteria might include:
Accessibility in Initial Acceptance Criteria
Accessibility requirements should be included in the initial acceptance criteria for the stories they affect rather than treated as a separate workstream or deferred until the end. Including them early makes it more likely that the team will address accessibility during design, carry it through implementation, and catch problems during testing.
Story Mapping
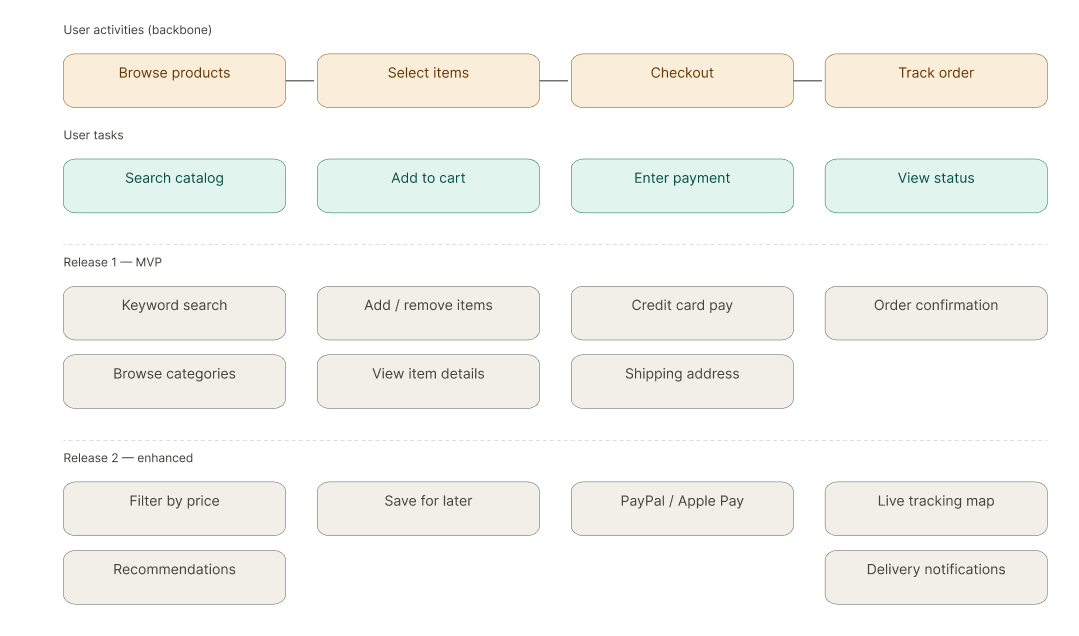
Story mapping helps you organize stories around the flow of a user's work so you can see how individual stories connect to the larger journey (Patton, 2014).
A story map places high-level user activities across the top in the order the work happens. Under each activity, you add the stories needed to support that part of the work. This makes it easier to connect individual stories to the broader workflow, spot gaps, and decide what belongs in the first release.
How to Create a Story Map
Used this way, story mapping helps you see the full picture and broader set of user needs. It keeps the team focused on a complete user journey rather than a disconnected set of features.
Turning User Needs into an Initial Backlog
As you synthesize research and map the user's work, you will usually identify backlog candidates along the way rather than waiting until the end. Story maps are especially useful here because they help you see the full journey, identify the most important stories, and decide what belongs in an initial release. The goal is to pull that work together into an initial backlog the team can use to start to capture user needs.
At this stage, backlog items are high level, capturing what you know so far and not the refined detailed user that will later guide delivery.
An initial backlog based on user needs work might include items such as:
Each item in your initial backlog should link back to the supporting research, the role affected, and its priority. That connection helps stakeholders understand why the item is there and gives the team a clearer basis for making and explaining design decisions as the work moves into design and development.
The backlog is not fixed at this stage. As the team learns more about the needs the solution must support, high-level items can be broken into more detailed user stories and initial acceptance criteria, then refined further as development approaches.
Validating and Refining User Needs
Capturing requirements is not the end of the work. Once you have translated research into stories, flows, maps, or backlog items, you still need to test whether those requirements actually support real user work. The earlier you do that, the less likely you are to spend time designing or building the wrong solution. Validation helps you confirm that the requirements are understandable, complete enough for the task, and grounded in the way people actually work.
When deciding what to validate and how, focus on the requirements that carry the most uncertainty, complexity, or risk. These often include high-value, multi-step interactions, exception-heavy processes, new capabilities, and areas where the research produced mixed signals. If a requirement is straightforward and well understood, further validation may add little value.
Across all the methods described below, watch for these signals during validation:
Stakeholder Walkthroughs
A walkthrough is a structured review in which you present the requirements and ask participants to evaluate whether they accurately reflect the work, whether they cover the right exceptions and edge cases, and whether the terminology matches what people actually use.
Walkthroughs are a low-cost, effective way to catch errors, incorrect assumptions, missing steps, and edge cases before the team invests more time in design or prototyping (Wiegers & Beatty, 2013).
How to run a walkthrough:
Prototyping
Prototyping is one of the most effective ways to test whether requirements actually support the user's work. Rather than treating requirements as complete once they are written down, prototyping lets you see whether users can understand the flow, find the information they need, and complete the task successfully. In that sense, a prototype is not just a design tool. It is also a requirements validation tool.
Paper prototypes and sketches work well for testing layout, information hierarchy, and navigation. They're fast to create and easy to modify on the spot, making them ideal for co-design workshops where you sketch with users and incorporate feedback in real time. Use them to test whether users can find the right information, whether a workflow makes sense, or whether the terminology is clear.
Wireframes and clickable prototypes add enough structure to test multi-step flows, transitions between screens, and the relationship between different parts of the interface. Use them when you need to test whether users can complete a task end-to-end, whether handoffs between roles are supported, or whether error states and recovery paths work.
Functional prototypes include real or realistic data, working logic, and closer-to-final interaction. Use them when you need to test technical feasibility, data quality, performance, or whether the system behaves as users expect under realistic conditions.
Wizard of Oz prototypes simulate system behavior using a person behind the scenes. The user interacts with what appears to be a working system, but some or all of the responses are generated manually. This approach is particularly valuable when you need to test requirements for functionality that would be expensive or time-consuming to build before you've validated that the proposed behavior actually meets user needs. Classic examples include testing a recommendation engine by having a domain expert manually select recommendations, or testing an automated approval routing system by having a team member route requests according to proposed rules.
How to Run a Prototyping Session
Accessibility Validation
Accessibility validation should happen alongside prototyping and general usability testing, not as a separate phase after the design is "finished." There are three practices to keep in mind when validating accessibility needs:
Using Generative AI to Validate User Requirements
Generative AI can support user requirements work, but it should play a supporting role. It can help teams brainstorm possible requirements, surface gaps, rephrase stories and acceptance criteria more clearly, and generate candidate scenarios or test cases. It can also be useful for first-pass screening by highlighting places where a requirement may be vague, incomplete, or inconsistent.
Those benefits do not replace research, stakeholder engagement, or human judgment. Generative AI does not know your users, your organizational context, or the consequences of getting a requirement wrong. It can suggest plausible additions or concerns, but you still need to decide whether those concerns are real, whether something is actually missing, and how the requirement should be revised.
Reviewing and validating requirements at scale. LLMs can help you review existing requirements, such as user stories, for quality problems. These tools can flag missing information and other quality issues, but they also produce false positives (Quattrocchi et al., 2024). Use them for first-pass screening, then apply your own judgment to decide what is actually missing and how each story should be revised.
Validating needs through prompt-based prototyping. LLM-based tools that generate code let you quickly produce working user interfaces and put them in front of users. You can also hand these tools to users directly, letting them create and explore their own designs. What they build, and the choices they make while building it, surfaces needs that interviews and written requirements tend to miss (Smajić, Radetić-Paić & Etinger, 2026).
Recognizing the risks. Because LLM outputs converge toward patterns in their training data, they can introduce biases that are global and consistent rather than local and varied, and automation bias makes those biases harder to notice when the output reads well (Göpfert, Weinand, Kuckertz, Pflugradt & Linßen, 2025).
Revising Requirements After Validation
Validation often shows that requirements need to be revised, clarified, or reprioritized. That is a normal and useful outcome, not a sign that the earlier work failed. A scenario that does not ring true to participants points to a gap in your understanding. A prototype that confuses users suggests that the related requirements or acceptance criteria need further work.
Common follow-ups include clarifying requirements, identifying missing conditions or exceptions, revising priorities, and refining personas or scenarios when validation reveals gaps in your understanding of the user's context.
Best Practices
Not every project needs every technique in this chapter. The right level of effort depends on the complexity, uncertainty, and impact of the work.
A small enhancement to an existing system may only need a few well-written user stories and clear acceptance criteria. A more complex enterprise initiative may call for a broader set of techniques, such as personas, journey maps, story maps, and prototyping.
As you do this work, keep these practices in mind:
Wrap Up and What's Next
With user requirements defined, you now have a clearer picture of what people need the system to support in order to do their work effectively. Chapter 6 turns to system and architectural requirements: the technical and structural qualities the solution must have to support those user requirements reliably, securely, and at scale.
References
Cohn, M. (2004). User stories applied: For agile software development. Addison-Wesley Professional.
Cooper, A., Reimann, R., Cronin, D., & Noessel, C. (2014). About Face: The essentials of interaction design (4th ed.). Wiley.
Göpfert, J., Weinand, J. M., Kuckertz, P., Pflugradt, N., & Linßen, J. (2025). Risks of AI-driven product development and strategies for their mitigation.
Patton, J. (2014). User story mapping: Discover the whole story, build the right product. O'Reilly Media.
Quattrocchi, G., Pasquale, L., Spoletini, P., & Baresi, L. (2025). Can LLMs generate user stories and assess their quality? IEEE Transactions on Software Engineering.
Smajić, A., Radetić-Paić, M., & Etinger, D. (2026). LLM use in early prototyping. Procedia Computer Science, 278, 1324–1331.
Stickdorn, M., Hormess, M., Lawrence, A., & Schneider, J. (2018). This is service design doing. O'Reilly Media.
Subramonyam, H., Thakkar, D., Ku, A., Dieber, J., & Sinha, A. K. (2025). Prototyping with prompts: Emerging approaches and challenges in generative AI design for collaborative software teams. In CHI Conference on Human Factors in Computing Systems (CHI '25). ACM.
W3C. (2024a). WCAG 2 evaluation methodology. World Wide Web Consortium.
W3C. (2024b). Involving users in evaluating web accessibility. World Wide Web Consortium.
Wake, B. (2003). INVEST in good stories, and SMART tasks. XP123.com.
Wiegers, K. E., & Beatty, J. (2013). Software requirements (3rd ed.). Microsoft Press.
© 2026 Richard Sturman. All rights reserved.
No part of this publication may be reproduced, distributed, or transmitted without prior written permission.